
Firstly if you haven't already I advise that you read this blog on Aperture Priority and then come back here.
So having mastered Aperture Priority Mode, it's now time to take a look at the possibilities that using Shutter Priority can bring!
Firstly how does Shutter Priority Mode work? Well it's really just the opposite of Aperture Priority. You select the shutter speed and the camera adjusts the Aperture.
Shutter Priority is generally for when we go to the extremes of super fast shutter speeds to freeze action, or slow shutter speeds to show motion blur, or super slow to show stars moving in the night sky or make waves on the sea look like smoke.
Why would we use this mode? Here's a couple of examples...

To convey speed. This shot was actually achieved by zooming out whilst the shot was being taken, giving it a bit of a warp speed effect.

To freeze action. Shutter speeds up in the thousandths of a second can really capture a moment in time. This is how you'd capture drops of water flying off a dogs shaking head. In order to get really fast shutter speeds you will need a lot of light. So bright days, studio lights and larger apertures will all help you get images at super fast shutter speeds.
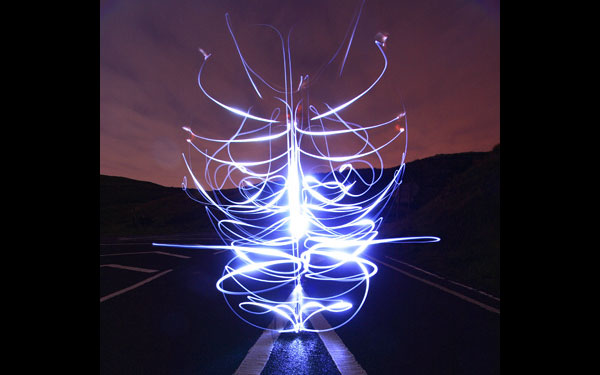
Light painting. Great fun! You need a tripod for this and long shutter speeds of between 5 and 30 seconds (you can go longer). This image will have been taken using something like a simple flash light. Over a 10 second exposure the camera will only record the light source, the person holding the light cannot be seen as they are not bright enough to be recorded and they would have been in constant motion. The brighter parts of the line will have been created by pointing the light source directly at the camera.


A tripod is used here to keep the background sharp. The shutter speed was set to around about 1 second to allow enough time for motion to be blurred.
These types of shots can take a bit of practice and a few attempts to get them right. The results are well worth the effort but can only be achieved by having full control of the shutter speed.
In future I will post articles on precisely how to do each type of shot.
In the mean time just have a play and see what you can do. It's excellent fun and really rewarding when you start to get it right.
No comments:
Post a Comment